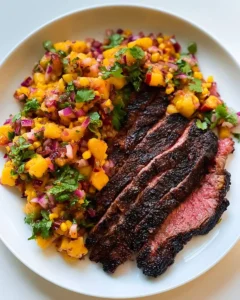

The first time I pulled a reverse sear steak from my oven, I honestly thought I’d ruined dinner. The meat looked almost gray, lifeless, completely unappetizing sitting on that wire rack. My husband walked in and gave me that look. You know the one. Thirty seconds later, the cast iron started screaming with butter and rosemary, and everything changed. That gray slab transformed into something I still dream about.
My dad was a grill guy through and through. Memorial Day to Labor Day, he was out there with his tongs and his opinions about charcoal versus gas. I never told him about reverse sear steak until his last visit, when his arthritis made standing at the grill painful. We made this together in my tiny kitchen, him perched on a stool with a glass of wine, watching that slow transformation in the oven. He took one bite and just nodded. That was his highest compliment.
This method changed how I cook beef entirely. No more guessing, no more cutting into raw centers or chewing through overcooked edges. If you want a complete meal, I love pairing this technique with my skillet steak with asparagus and potatoes for something that feels restaurant-worthy without the reservation.
The Ingredients That Make Reverse Sear Steak Work
Thick-cut ribeye is non-negotiable here. I learned the hard way that anything under one and a half inches just cooks too fast in the oven, giving you no margin for error. The fat cap matters too. That white ribbon along the edge melts slowly in the low oven, basting the meat from the inside out. I use kosher salt exclusively. The larger crystals draw moisture to the surface, then let it reabsorb, carrying seasoning deep into the muscle. For a special occasion, I sometimes splurge on surf and turf with my steak and shrimp surf and turf, but honestly, this reverse sear steak needs nothing else.

How to Make Reverse Sear Steak
The oven does the heavy lifting while you pour yourself something nice. I set mine to 250 degrees and slide the seasoned steak onto a wire rack over a baking sheet. The kitchen fills with this subtle, meaty warmth that builds slowly. Twenty minutes in, I start checking with my instant-read thermometer. I pull it at 115 degrees for medium-rare, knowing that sear will push it to perfect.
The cast iron gets ripping hot while the steak rests. I mean smoking, can’t-hold-your-hand-above-it hot. The butter hits and immediately foams, turning nutty brown in seconds. That first contact between meat and metal is the sound I wait for. The sizzle should be aggressive, almost violent. Thirty seconds each side, then I tilt the pan and spoon that brown butter over the top until the crust looks like something from a steakhouse window.
I learned this technique from my favorite grilled ribeye steak experiments, adapted for days when the weather doesn’t cooperate. The resting period is crucial. I set a timer for ten minutes and walk away. Cutting too early ruins everything you’ve built.
What I Learned Making Reverse Sear Steak Five Times
Room temperature meat is a myth that wastes time. Straight from the fridge works fine because the low oven brings it up gently anyway. I stopped bothering with the counter rest and got better results.
Patience with the sear pan pays dividends. I used to rush this, starting before the pan was truly hot. Now I wait until a drop of water evaporates in under two seconds. The crust I get now is dramatically better.
Butter choice matters more than I expected. European-style with higher fat content browns slower, giving you more control. Regular butter can go from perfect to burnt while you’re still processing what happened.
My Secret Trick: I save the rendered fat and browned butter from the sear pan, strain it through fine mesh, and use it to fry eggs the next morning. Those eggs taste like the best diner breakfast you’ve never had.

How to Store Reverse Sear Steak
- Refrigerate leftover steak within two hours of cooking in an airtight container
- Store in the coldest part of your fridge for up to three days
- Freeze individual portions wrapped tightly in plastic wrap, then foil, for up to two months
- Thaw frozen steak overnight in the refrigerator, never on the counter
- Reheat in a 250 degree oven until internal temperature reaches 110 degrees, about 15 minutes
- Finish with a quick sear in hot butter to restore the crust
- Slice cold leftovers thin against the grain for salads or sandwiches
Why Reverse Sear Steak Fits a Protein-Focused Routine
Ribeye delivers complete protein with all nine essential amino acids, plus significant B12 and zinc that support energy and immune function. The slow oven method preserves more nutrients than aggressive high-heat cooking, and because you’re controlling the temperature precisely, you avoid the charred compounds that form when meat meets flame directly. I feel good serving this to my family knowing we’re getting quality fuel without the guesswork.

FAQs
What cut of steak works best for reverse sear?
Thick-cut ribeye is my absolute favorite, but New York strip and filet mignon work beautifully too. The key is thickness. Anything under one and a half inches won’t give you enough time in the oven to develop that gentle, even cooking before the sear. I avoid thin cuts like flank or skirt entirely. They cook too quickly and become tough.
Can I use a regular pan instead of cast iron?
Cast iron holds heat better than anything else, which is crucial for that final sear. Stainless steel can work in a pinch, but you need to preheat longer and use more oil. Non-stick pans are a hard no. They can’t handle the high heat and won’t give you the crust you’re after. Invest in one good cast iron skillet and it will outlast you.
How do I know when to pull the steak from the oven?
An instant-read thermometer is essential. I pull at 115 degrees for medium-rare, 120 for medium. The reverse sear steak will continue cooking during the sear and rest, rising about ten degrees total. Without a thermometer, you’re guessing, and this method is too good to leave to chance. They’re fifteen dollars and will change your cooking life.
Why is my crust not browning properly?
Your pan wasn’t hot enough, or your steak was too wet. Moisture is the enemy of browning. I pat mine aggressively with paper towels before seasoning, then let it air-dry uncovered in the fridge for an hour if I have time. The pan should smoke slightly when empty and screaming when the butter hits. Patience here separates good from great.


Reverse Sear Steak
Ingredients
Equipment
Method
Notes
Conclusion
Reverse sear steak taught me that the best cooking often looks wrong before it looks right. That gray oven phase still makes me nervous, every single time. Then the sear happens, and I remember why I trust this method. For an indulgent variation, try my garlic butter ribeye steak. Either way, you deserve this kind of confidence in your kitchen.
Follow us on Social Media : Pinterest